How To Use Silhouette Cameo 3? [A Tutorial For Beginners]
A big welcome to all the Silhouette Cameo 3 owners. I am happy that you made your purchase and are going to make crafts with your Cameo 3. But, using a machine for the first time may be tricky, especially for those who are new to crafting. If you are thinking about what to do next, I am here to help you. Here, I have prepared a full guide on how to use Silhouette Cameo 3 so that all beginners can search for their answers. Let’s get started with your brand-new Cameo 3 machine.
What Is A Silhouette Cameo 3 Machine?
The Silhouette Cameo 3 is an advanced DIY machine equipped with a small blade that cuts over 100 materials, such as paper, vinyl, cardstock, and fabric, up to 12 inches wide. Also, the Cameo can use registration marks for print and cut applications. The Silhouette Cameo 3 combines all the features of its predecessors and some additional features. The Cameo 3 has a dual carriage system that can handle two tools simultaneously. Plus, it features Bluetooth technology to connect to devices. The machine also includes the auto blade.
How To Use Silhouette Cameo 3 Machine?
When it comes to using, the first and foremost thing is unboxing or unpacking. Let’s see the complete procedure for using the Silhouette Cameo 3 machine.
Unboxing
When you open the box, make sure all necessary items are included. If any item is missing, you can contact Silhouette for a replacement or a return. Here is what you will get in the box.
- Silhouette Cameo 3 machine
- USB cable
- USB cable
- A/C adapter and power cable
- Auto blade
- 12″ cutting mat
- Bluetooth removal tool
- Crosscut blade
After you unbox, remove all the tapes and foam from the machine. And then move to connect it to a device.
Connect Silhouette Cameo To Your Windows/Mac
First, plug the A/C adapter into the right side of the Silhouette and press the power button to turn it on. Now, you will see the initial setup screen on the touchscreen. Then, select your preferred language. When you have connected the printer to the computer, move to install the Silhouette Studio software.
Install Silhouette Studio Software
Now you need to move to the Silhouette site having an option in the top right corner of the screen as ‘Update Software.” Once you click that button, a link will appear to download the Silhouette Studio. Then, select Windows or mac, depending on your operating system.
If you are using a Mac, you will have to drag and drop the Silhouette Studio icon into your application folder, while in the case of Windows, you will have to follow the on-screen instructions to install the Silhouette Studio software.
Enable Bluetooth
Once you install everything, you can enable the Bluetooth of the Cameo 3. This feature will allow you to connect the machine and computer. You will find the Bluetooth option in the upper left corner of the screen of your Cameo. This option will show that the Bluetooth is enabled and working. If it’s not turned on, you can turn it on by touching the settings menu on the screen.
In settings, open the Silhouette Studio software and click on Silhouette and scroll down to Add Bluetooth Machine. Your machine will appear here, and the option to connect. Then, click Connect.
Now, select Silhouette Cameo 3 from the list of Bluetooth devices, and the machine will connect to the computer. The connection is finished when the screen says ‘Ready.’
If you have difficulty enabling Bluetooth, you must do the same steps from the computer. In the case of a mac, locate the Bluetooth icon in the System Preferences menu and click on it. Make sure that the Bluetooth connection is enabled.
Then, find the Cameo 3 in the list of Bluetooth devices and click ‘Pair.’ It will take a few seconds to show that your devices are connected.
Use The Silhouette Studio
Let’s start with something very basic to learn how to use Silhouette Cameo 3. Once you set up all the settings, come back to the Silhouette Studio software. It appears as a main screen with a 12 X 12 cutting area. Follow the instructions to make a design on Silhouette Studio.

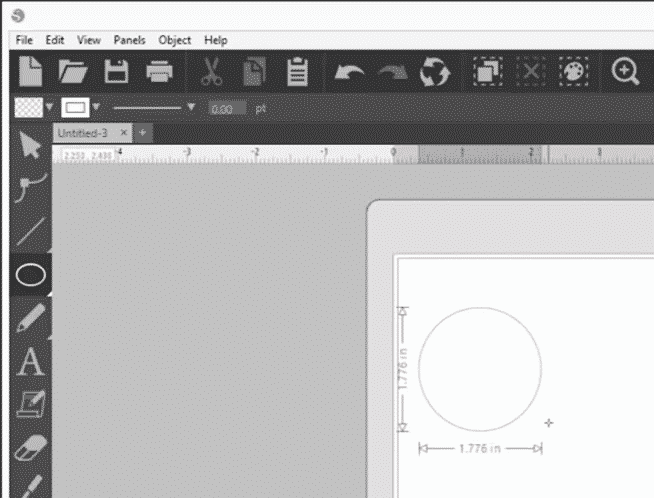
- On the main screen, click the Shape tool on the left.

- In the cutting area, click and drag with your mouse and draw a circle. Then, it will show exactly where your image will be cut on the mat.
- Next, connect your Cameo 3 to the computer using a USB cable. Remove the protective liner from your cutting mat to save your mat for later use.
- Place your material in the top upper left corner of the mat. In our example, we are using cardstock.

- Now, adjust the left edge of your mat with the blue guide marks on the machine. Ensure that the cutting mat rests against the white rollers.
- Tap the load button on the touchscreen. Now, the cutting mat is loaded into the Silhouette Cameo 3.
- Get back to the Silhouette Studio. Then, click the “Send” tab on the top right of the screen and select the right material type. In our example, we will use “Cardstock.” Next, select “Cut” as the action and select “Autoblade” as your tool. Usually, these are the default settings, but sometimes they might change. When you see that everything is in order, click the ‘Send’ button on the bottom right to start cutting.
- The machine will adjust the blade automatically according to your material.
- Once the design is cut, move forward and tap ‘unload’ on the touchscreen to unload your mat.

- Lastly, you can remove the cut material from the mat.
Finally, you have cut a material using your Silhouette Cameo 3. It looks like hard work, but it becomes easier when you get yourself into practice.


Comments
Post a Comment